

On the surface, saving images for the web can be a pretty straightforward process. However, if you dig deeper there’s a wealth of information and techniques you might be missing out on. This article will focus primarily on the diverse features of Photoshop’s “Save for Web & Devices” command along with some best practices related to saving images that are optimized for web use.
We’ll start extremely basic for all the beginners, but there will be plenty of advanced information for the seasoned veterans who work for professional web design teams as we progress. 
Before the Save
Preparing images for the web doesn’t start at saving. It’s a good idea to check out a few things before you go into the Save for Web dialog.
First, you’ll want to have a look at your image mode. When designing for the web or any other on-screen media, you’ll want to make sure your images are formatted in RGB. Traditionally, CMYK is reserved for print.
This is because there is a fundamental difference between creating colors with light vs. simulating colors with ink. While printers use tiny dots containing only one of four colors (Cyan, Magenta, Yellow or Black) to create the illusion of other colors, screens are capable of producing millions of colors. Furthermore, RGB is an additive system, meaning the result of greater amounts of color is white.
Conversely, CMYK is a subtractive system, meaning the lack of any color is white (the color of most paper) and colors are added to approach black. Additive systems are capable of producing much brighter colors across a wider spectrum. The key information here is that for on-screen graphics, you can’t beat an RGB image.
Keep this in mind at the very start of a project, especially if you’re creating web graphics with Photoshop. Starting in an RGB workspace is far better than working with CMYK and converting later, which can create mottled gradients and muted colors. Photoshop’s Save for Web command will automatically convert CMYK images to the appropriate color system based on your choices in the dialog, but you’ll definitely want to know and consider the original color mode of the image before you even enter the dialog.
If you don’t know the color mode of a given image, look in the menu bar under Image > Mode. The second thing you’ll want to consider is the size of the original image. If your image is too large, hitting “Save for Web” will give you this warning: 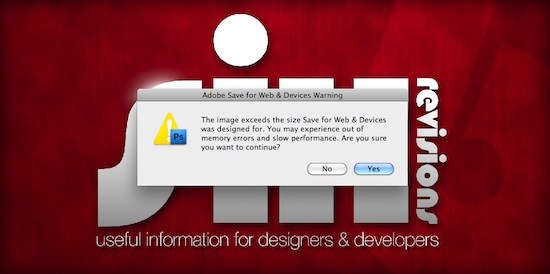 Essentially, Photoshop is telling you that your image is not only way too big for most web uses, but is also larger than the Save for Web command was created to handle.
If you click “proceed” Photoshop will in fact go through with the save. However, the dialog and included commands can be painfully sluggish due to the size of the file, depending on your computer system resources. It’s a good idea to downsize large files before entering the Save for Web dialog to prevent any problems.
Entering the Save for Web Dialog
Once you have your color mode and image size all squared away, hit Cmd/Ctrl + Shift + Alt + S on your keyboard to bring up the Save for Web & Devices dialog. 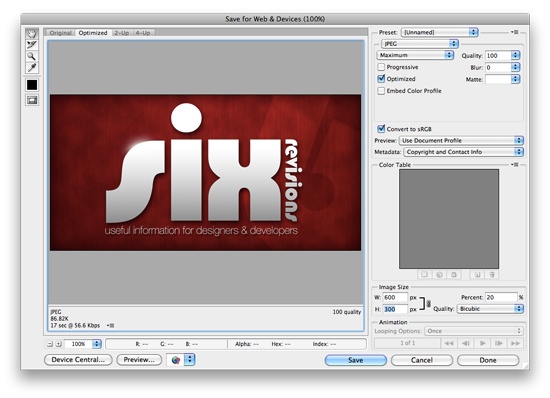 If you’re not familiar with this dialog, it can look a bit overwhelming at first. In fact, even if you’re a time-tested Photoshop professional but don’t possess CS4, things are going to look a bit different as Adobe has completely redesigned this menu.
Everything in here is important, but you’ll find there are a few key features that you will use most often, highlighted below. 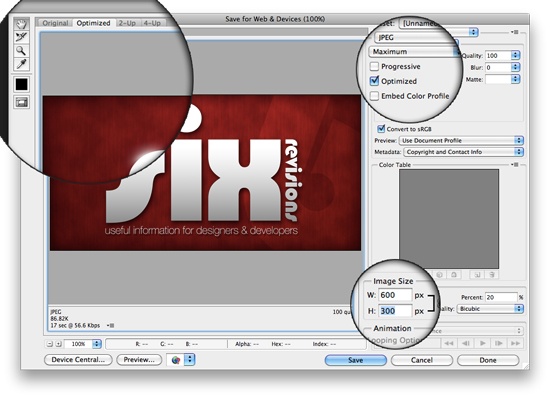
Image Size
In the bottom right of the window, you should see a section labeled “Image Size”. This section is pretty straightforward and works just like it did in previous versions of Photoshop.  You can choose to set the dimensions using either pixel height/width or by simply typing what percent of the original size you want your image to be. As you adjust these numbers, pay attention to your image preview as it will update to reflect the changes.
Resampling Quality
The most complicated part of this section is the Quality drop down menu. If you open it up, you’ll see that you have the choice of selecting Nearest Neighbor, Bilinear, Bicubic, Bicubic Smoother, or Bicubic Sharper. Each of these reflects a different method of pixel interpolation.
Resizing an image with only basic interpolation simply enlarges/reduces the pixel data and can produce some pretty ugly results. To prevent this, Photoshop attempts to manipulate the way the pixels are interpreted as the size of the image changes. Unfortunately, there is no best solution for every image and Photoshop isn’t smart enough to decide which mode is best for a given image.
By default, Bicubic is selected. This is generally good enough for most beginners and is in fact the most complex method. However, if you really want to learn to maximize your output, check out the brief explanations of the pros and cons of each method below.
Nearest Neighbor: This setting is the most basic interpolation mode and seeks to preserve the hard edges in an image by simply enlarging or reducing the pixel data as mentioned above. This may be good if your image doesn’t contain many gradients but will produce an over-aliased, pixelated image if you are significantly changing the size. Bilinear: Slightly more intelligent than Nearest Neighbor and uses a weighted average of the 4 nearest pixels to increase the number of pixels.
This method produces an anti-aliasing effect which eliminates harsh pixelated edges but can produce a blurry image as a result. Bicubic: Bicubic is the most complicated method and samples from the nearest 16 pixels. As with bilinear, this method results in anti-aliasing to keep out any unwanted artifacts.
There are three versions of the Bicubic method in Photoshop: Bicubic, Bicubic Smoother and Bicubic Shaper. To get a hint for when to use each, we’ll look to another part of Photoshop. Close the Save for Web dialog and go the menu bar under Image > Size > Image Size.
Now look under the “resample” dropdown menu and you’ll find some familiar options. 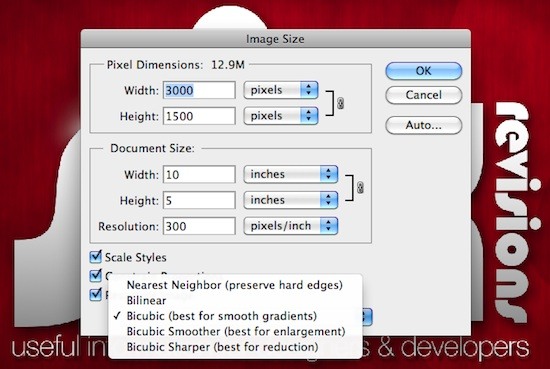 This time we see that each option (except Bilinear) comes with a little tip regarding when to use it. We can now see that each Bicubic option has a strength: Bicubic is best for creating smooth gradients, Bicubic Smoother is best for enlargement and Bicubic Sharper is best for reduction.
Always keep these tips in mind when resizing images within the Save for Web dialog. However, don’t blindly follow them without examining the results of each to decide which option is best for a particular image.
File Type and Image Quality
Near the top right of the window you’ll find the settings to choose which type of file you want to output along with various options pertaining to the quality of the output.
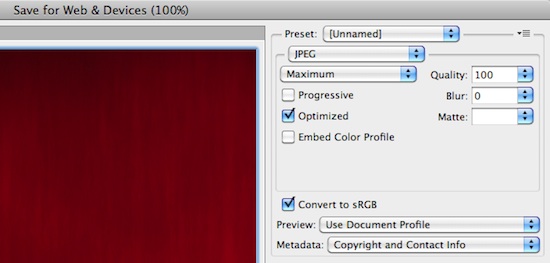 As you adjust these settings, you’ll obviously want to keep an eye on your image preview, but just as important as the way the image looks is the information directly under the preview pertaining to the image size and approximate load time.
 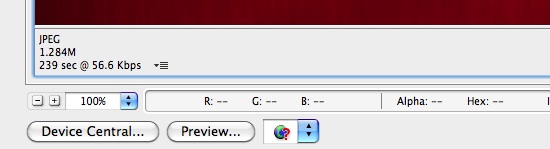 Remember that there is always a trade-off between quality and file size. As a beginner, you may be tempted to choose quality over size and shoot for the maximum, but this is a big mistake that can cause your sites to load painfully slow.
As you can see in the images above, by default my file size is coming in at nearly 1.3 MB. This is much larger than is preferable for most web images. With only a few size and quality adjustments, I can easily knock this down to around 20 KB (a much more preferable size).
File Type Options
There are three main file types we’ll want to focus on for saving images optimized for the web: GIF, JPG and PNG. Each file type has its own strengths and weaknesses and it is very important to know and keep these in mind when saving an image. We’ll start with the most complicated: GIF.
Working with GIFs
GIFs are popular for simple web-based graphics because of their relatively low file size. However, GIFs are restricted to a mere 256 colors and should therefore be used very selectively. Many designers will point out that photographs should not be saved as GIFs because of the millions of colors necessary to recreate a “real life” scene.
This is definitely correct but does not give you the freedom to use a GIF on all non-photographic elements. For instance, the “six revisions” graphic that we’ve been using thus far was created in Photoshop and is therefore non-photographic, but it is still a very poor candidate for a GIF file. Check out the close up below of the text highlight using GIF compression:  As you can see, even with the highest number of colors enabled, the gradient from white out to red is pretty mottled.
However, this definitely does not eliminate GIF as a useful file format. There are plenty of times when you’ll save an image such as a logo that may only have a few colors in it. Anything with large areas of solid color and very minimal gradients should look great as a GIF.
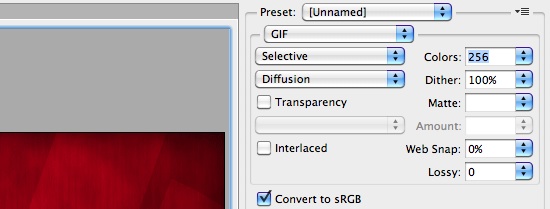
For instance, if our image were changed to look more like the one below, we’d have a lot more freedom over which file type to use.  As you can see, the above image is fairly simple and shouldn’t even require the full 256 available colors. With GIF selected as the file type in the Save for Web dialog, you’ll have several options for how many colors you want to use ranging from 2 to 256.
 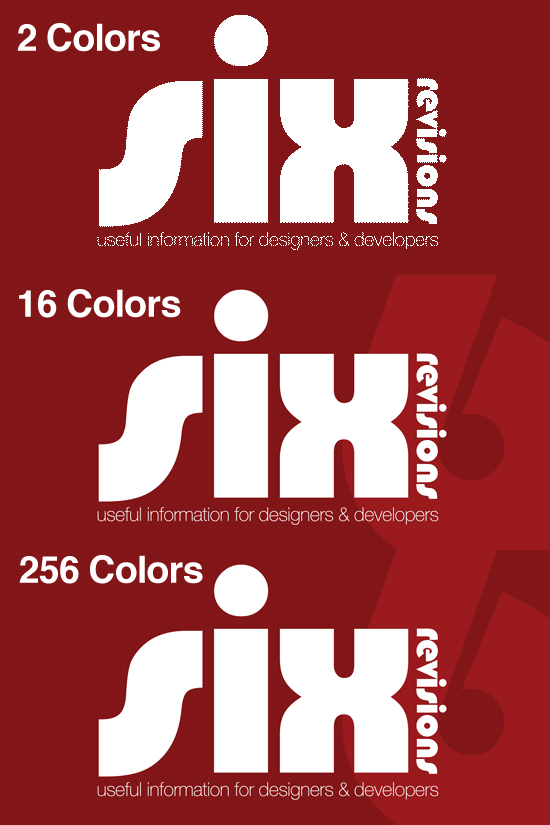 Obviously, 2 colors is far too few to create a nice image. However, 256 looks a bit like overkill because our 16 color version is coming in so nice. This version comes it at a mere 7K while a JPG of similar quality would push us up to more than double that at 16K.
Other ways to reduce the file size of a GIF include reducing or eliminating any dither, adjusting the color palette settings (perceptual, adaptive, etc) and increasing the lossy compression. It would take at several more paragraphs to do these options justice so I’ll just encourage you to adjust these settings while watching the file quality and size to attempt to find an ideal result.
Working with JPGs
As I mentioned before, JPGs are going to be your best bet when working with photographs or graphics containing complex effects like shadows, gradients, etc.
Because of the wide range of colors available in a JPG, you don’t have to worry about selecting a color palette. This just leaves the basic quality settings to adjust. To adjust the image quality, either use the “Quality” slider on the right, or the present dropdown on the left (ranging from low to maximum).
Again, remember to keep an eye of both your image preview and file size as you sample different settings. As you can see in the image below, there’s a wide gamut of quality between the lowest and highest settings.  Notice that as the quality decreases, it’s not just the hard edges that suffer but also the gradients as well.
The graceful degradation from one color to another becomes a sloppy mess with clearly identifiable steps of color. However, at the largest size we’re pushing 90K, which is a bit unnecessary for this small image. You’ll find that the best solution is almost always somewhere between the lowest and highest settings.
Try to find the lowest quality setting that doesn’t significantly degrade the finer visual details of your image. Tip: By increasing the “Blur” option when saving a JPG, you can reduce file the size. However, only do this to the degree that it doesn’t significantly degrade the quality of your image.
Working with PNGs
Photoshop gives you two options when working with PNGs: PNG-8 and PNG-24. If you bring up the PNG-8 options, you’ll see that they are very similar to the options we saw for GIFs. Again we are back to choosing the number of colors up to a maximum of 256. This means that PNG-8 is limited to the same types of simple files that you would use for GIFs. Sometimes using a PNG-8 over a GIF can give you a smaller file size at a nearly identical quality. It’s best to experiment with both to see which provides a better result PNG-24 on the other hand, provides a much higher quality image.
PNG-24s retain much of the original PSD image quality and can handle transparency much better than a GIF. 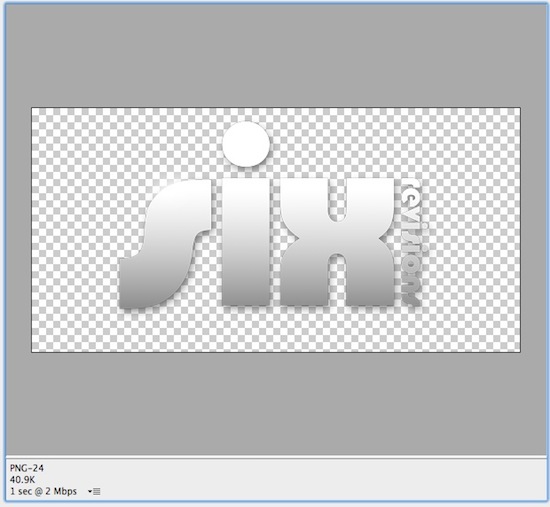 As you can see in the image above, the shadow quality is fairly high and would look just fine dropped onto a solid background in an HTML file. However, there are two big downsides to using PNGs.
The first is file size; notice that for the 550px wide PNG above the file size in 40.9K. This isn’t too bad for most modern internet connections but it’s a lot larger than an equivalent JPG or GIF and can really bog down a web page with a lot of images. The final and even more serious downside of using transparent PNGs is that they are not supported by all major web browsers.
Nearly every professional web designer is aware of this and either ignores it in defiance of all users who won’t update their browsers, avoids using PNGs altogether, or comes up with clever hacks to trick browsers such as IE6 into submission. No matter which method you choose to live by, be sure to make an informed decision before leaving behind any visitors. If you already have a site, use Google Analytics or some equivalent to track the percentage of visitors you’re getting with browsers that don’t support PNGs.
This allows you to make the best decision to cater to your current user base.
View Modes
By now you may be feeling a bit overwhelmed with the number of options available for saving images for the web. You might be thinking that switching between various options is too time intensive and that comparing those options accurately is nearly impossible without saving out a version of each.
Fortunately, Photoshop eases these concerns by allowing you to see multiple options at the same time. In the top left corner of the Save for Web dialog, you’ll notice 4 tabs labeled Original, Optimized, 2-Up and 4-Up. These are often overlooked by designers but are extremely helpful in deciding on the optimized settings for a given image.
Original and Optimized
Viewing both the Original and Optimized tabs will give you a single image preview. The principal difference is that Original allows you to see the unaltered PSD while Optimized lets you see what the image will look like after it is saved with the current setting.
2-Up and 4-Up
These two tabs make saving images for the web a lot easier by allowing you to experiment with different options without losing settings.
They both work exactly the same way and differ only in how many options you get to experiment with. 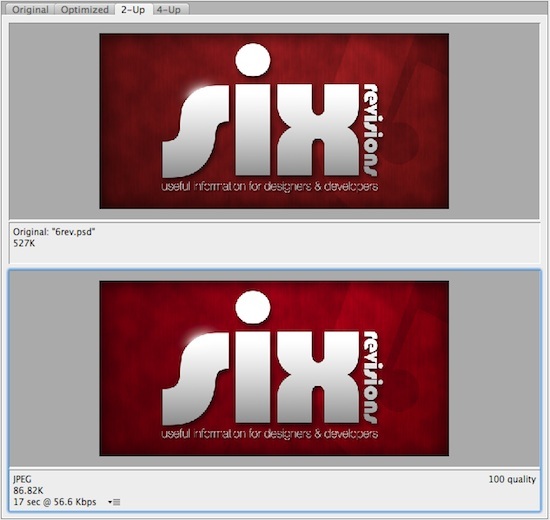
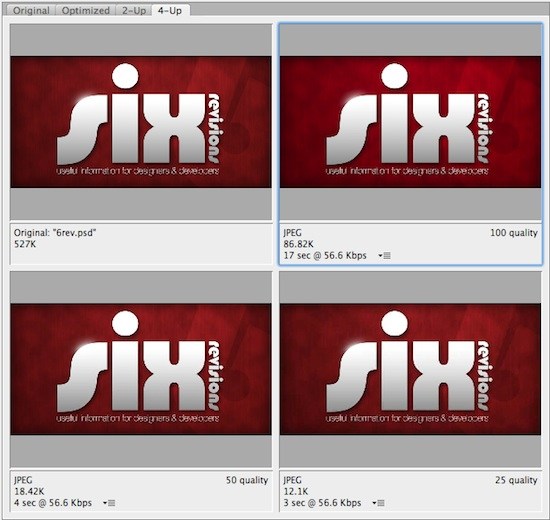 Each preview shows you the file type, size, quality and approximate loading time of the image with the settings pertaining to that selection. If you select a preview by clicking on it, you can change its settings on the right by using all of the methods discussed above.
Then you can select another preview and change its settings for a quick visual comparison. You can compare across file types (JPG, PNG, GIF, etc) or within a given file type and limit the variation to quality settings. If you’re doing the latter, Photoshop can automate the task by automatically populating each window with a different setting so you can see which direction you want to go.
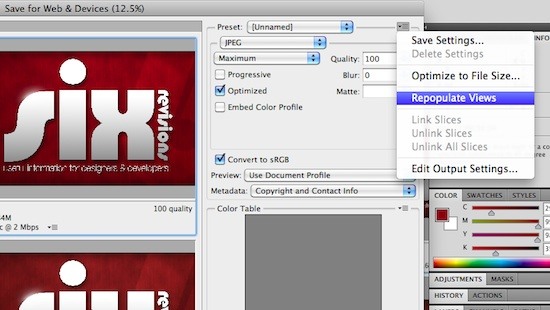 First select the type of file you think you’ll need, for instance: JPG. Then follow the picture above to locate the dropdown at the very top right of the Save for Web window. Click on this and go down to “Repopulate Views.” This will automatically fill each view with a JPG containing various quality settings.
Just find the one with the most acceptable image clarity and file size and tweak the settings until you’re satisfied. This method makes it much easier for beginners to get a feel for the settings without spending a lot of time digging through them one at a time.
Working with Slices
 Web designers that handle most of the initial layout in Photoshop usually work in one of two ways.
They either pull images out of the layout and crop/save them individually, or they use Photoshop’s built-in slicing tools to select and save different parts of the image. If you’re the type of designer that frequently use slices, there area a lot of options in the Save for Web dialog to speed up your workflow. Using the Slice Select Tool (C), found in the upper left, you can select individual slices to work with (hold shift to select multiple slices).
Using this method, you can change the settings of each slice. This means if you want your header image to be a GIF but your footer to be a JPG, it’s as easy as selecting each slice and assigning a file type. After you’re done, hit the “Save” button to bring up the save dialog.
Here you can decide if you want to save all the slices in your image as individual files or just those that you have selected. Exporting all slices at once allows you to accomplish the feat of collecting all the images you need from your PSD layout in a single step. This can save you loads of time if you’re working with a complex site design.
Outputting HTML
The final feature we’ll discuss is using the Save for Web dialog in conjunction with slices to output an actual HTML file. To begin, slice up your PSD and bring up the Save for Web dialog. After you get the settings you want for each slice, go back to that dropdown in the very top right of the window and click on “Edit Output Settings.” 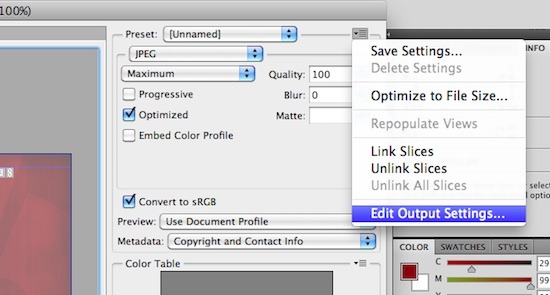 This should bring up a window that gives you options to adjust the settings for HTML, Slices, Background, and Saving Files.
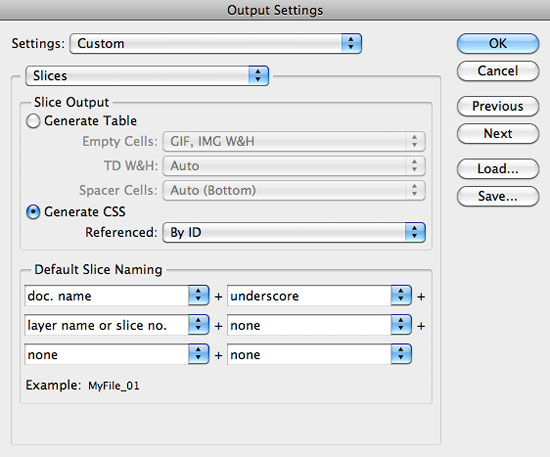
Using these options you can adjust whether you want to output XHMTL, what color you want your background to be, what naming convention you want to use, etc. Most of these options are pretty straightforward and don’t require further explanation but I will recommend though that you select “Generate CSS” instead of “Generate Table” under the Slices menu. Unless you are actually trying to create a table, modern web standards discourage using tables to generate a web page layout.
 Finally, to export your sliced PSD as an HTML document, hit “Save” and select the option to export “HTML and Images.” Don’t expect to use this method to build an entire website in Photoshop. It’s simply meant to aid the process of exporting the images and marking them up in HTML. If you do most of the layout in Photoshop anyway, using the export HTML option can save you a lot of time setting up the initial HTML file.
The downside is that there will be plenty of clean up to do to organize the code in your preferred manner. Consequently, most seasoned coders will prefer to skip this method entirely and code from scratch, but I encourage you to experiment with it to see if you can improve your workflow in any way.
Conclusion
The information above is more than enough to start you on your way to becoming a Save for Web guru.
I hope you’ve learned a thing or two you didn’t know about Photoshop’s “Save for Web & Devices” dialog. Use the comment section below to let us know what you thought of the article. Also, there’s actually still plenty more to the dialog that we didn’t go over so feel free to point out any features that you use regularly that weren’t mentioned above.
These skills are great to know for designers because they can be used on websites in any industry, from a realtors site to local restaurants!
Related Content
- 8 Excellent Tools for Optimizing Your Images
- How to Auto Caption Images Using MooTools
- 15 Best Places for Designers to Get Free Stock Photos Online
- SEO for Images
- Related categories:Web Design and Web Development
-
 President of WebFX. Bill has over 25 years of experience in the Internet marketing industry specializing in SEO, UX, information architecture, marketing automation and more. William’s background in scientific computing and education from Shippensburg and MIT provided the foundation for MarketingCloudFX and other key research and development projects at WebFX.
 -

WebFX is a full-service marketing agency with 1,100+ client reviews and a 4.9-star rating on Clutch! Find out how our expert team and revenue-accelerating tech can drive results for you! Learn more
Make estimating web design costs easy
Website design costs can be tricky to nail down. Get an instant estimate for a custom web design with our free website design cost calculator!
Try Our Free Web Design Cost Calculator
Share this article


Web Design Calculator
Use our free tool to get a free, instant quote in under 60 seconds.
View Web Design CalculatorMake estimating web design costs easy
Website design costs can be tricky to nail down. Get an instant estimate for a custom web design with our free website design cost calculator!
Try Our Free Web Design Cost Calculator


