
As the web design field opens up more and more to designers with a limited technical knowledge, the prospect of developing a website can seem like a staggering and scary feat. This may seem even more difficult if you are new to working with developers who will be engineering the website to your design specifications. In this article, we examine some fundamental tips and tricks to help you work with developers and ensure your designs are pixel perfect.
I’ll assume that you’ll be using Photoshop, but all these principles apply regardless of what design tool you use.  I will be quickly moving across several topics so feel free to add your own tips in the comment section.
1. Have a solid plan
 The saying “failure to plan is planning to fail” rings all too true in web design and development. Having a game plan is essential in creating successful websites, but more importantly, when trying to make sure a developer understands your expectations. One great way of avoiding this miscommunication is having a developer review your wireframes before you invest any time in designing.
This is a great stage to ask your developer questions like, “Is this possible within our budget” or “do you see [insert your concern here] being an issue?”
2. Hand off a good mockup of your web design
Before firing up Photoshop and starting on a design, there are graphical elements to be mindful of.
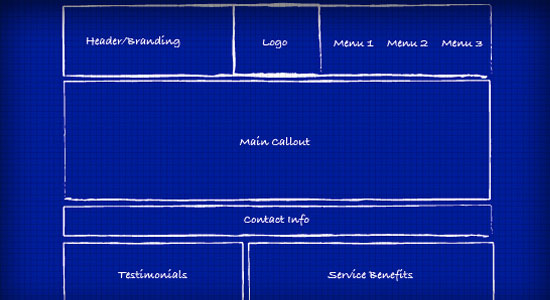
Grid system
 We want to ensure that our site will be compatible across different resolutions, so utilizing a 960px grid system is a great way to avoid any surprises when the finished website is viewed on various monitors. Using a grid system will also provide a structure for you and your developer to make sure your design stays perfectly aligned.
Using a gridded layout is the easiest and best way to get pixel-perfect web designs. Grid-based layouts also provide a way for you to streamline your design processes because a lot of guessing and obsessive tweaking is removed from the workflow.
Layouts that scale with the growth and changes of a website
One important point to be aware of is that your website, once it’s launched, will take on a life of its own.
Whether a client has additional content they want to add, or the site is ready for the next phase of development, it is important to have an idea of how your site will scale and grow. How will your layout be affected if five more paragraphs of text are added? Does your navigation allow for additional pages to be added?
Theses are some questions to ask yourself and have answers for once you begin working with your developer.
Organization of the mockup
There is a lot to be said about a well-organized Photoshop document. Organizing your document in a clear and consistent manner allows your developer to easily locate and disassemble your design.
This can be done by organizing your Photoshop document with web related naming classes. For example, you may want break your design down to elements such as header, main content area, footer, and sidebar. You may also want to group your graphics accordingly in a logical manner.
Additionally, a well-arranged and modular Photoshop document means that you should be conscious about separating elements as much as possible into layers; there’s nothing worse than trying to isolate a piece of the design, only to find out that it’s merged with other design elements. This may seem obvious, but you might be surprised how much development time will be saved by staying organized. On this note, it’s also essential to make sure that you strive to provide your developer with all the imagery and links your design may need upon launch.
These items can include items like various states of the navigation system (normal state versus hovered state), interface buttons like Call to Action buttons, etc. (Learn how to create an animated call to action button). 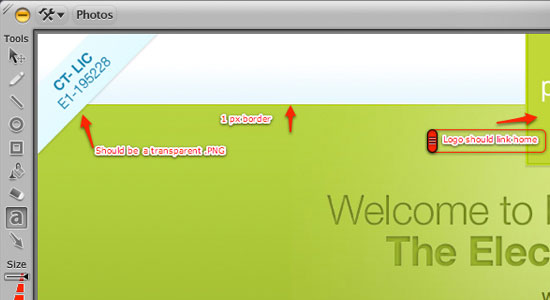 If you have any other specific notes you would like to share that you feel are essential to your design, you may want to use an application such as Skitch.
Skitch allows you to mark up your design with notes that can help communicate points that otherwise might be hard to put into words. (See a list of other web-based collaboration tools that you can use).
3. Learn about UI functionality
When designing with elements that will have special behaviors and actions, take the time to find examples and supporting documentation to give your developer an idea of what you are talking about.  Developers are not mind readers and may not meet your expectations if you are presenting elements in a static state with zero notation. Search around, there are great documents, demos, and tutorials on virtually every type of action and behavior – you’ll be glad you did, even if its just for your edification.
(For inspiration, check out this huge list of interface techniques and tutorials).
4. Give good feedback
Once your developer has completed coding your design, there will likely be revisions by you and your client. It’s rare that anyone hits it out of the park on the first try and now you have the task of presenting the revisions in a clear manner. You will want to strive to be as specific as possible to avoid confusion.
Keeping tabs on how many revisions will help you and your developer keep tabs on version control. (Read the ultimate guide on version control for designers).
Conclusion
Taking the time and effort to stay organized will pay off in the end.
If you’re a designer new to website development, never let an opportunity to learn something new pass you by. Ask your developer questions and learn from your mistakes to ensure your next project will move along on schedule and your design will come off as planned.
Related Content
- The Evolution of Web Design
- How to Use Retro Colors in Your Designs
- Inspirational Tips and Tools from a Designer
-
 President of WebFX. Bill has over 25 years of experience in the Internet marketing industry specializing in SEO, UX, information architecture, marketing automation and more. William’s background in scientific computing and education from Shippensburg and MIT provided the foundation for MarketingCloudFX and other key research and development projects at WebFX.
 -

WebFX is a full-service marketing agency with 1,100+ client reviews and a 4.9-star rating on Clutch! Find out how our expert team and revenue-accelerating tech can drive results for you! Learn more
Make estimating web design costs easy
Website design costs can be tricky to nail down. Get an instant estimate for a custom web design with our free website design cost calculator!
Try Our Free Web Design Cost Calculator
Share this article


Web Design Calculator
Use our free tool to get a free, instant quote in under 60 seconds.
View Web Design CalculatorMake estimating web design costs easy
Website design costs can be tricky to nail down. Get an instant estimate for a custom web design with our free website design cost calculator!
Try Our Free Web Design Cost Calculator


