
 WordPress is a great blogging and CMS platform. It’s easy to use and customize, and there’s basically nothing you can’t do with it. If you haven’t used WordPress, give it a try by installing it on your own computer using a web server package like xampp or WampServer.
You’ll need access to WordPress in order to follow along with this guide. In this guide, we will take a look at some common functions in WordPress for use in custom WordPress theme development.
Introduction
As a developer, one of my favorite things about WordPress is its built-in functions, which allow you to easily manipulate and extend WordPress with just a few lines of code.
WordPress functions are an essential component of WordPress theme development; once you understand how they work, it’s easy to create your own custom WordPress themes.
Navigation
The most popular sets of functions in WordPress are navigation-related functions. For navigation menus, a popular function for dynamically generating them is to use the wp_list_pages WordPress function.
Another method for dealing with site navigation was recently introduced in WordPress 3.0: the wp_nav_menu function. We’ll talk about these two functions, starting with wp_list_pages.
Listing All Pages
If you want to list all of the pages you’ve got (note that pages and posts have different meanings in WordPress vernacular), there’s a simple function for that called wp_list_pages. When used without any parameters, it will list all of your pages in alphabetical order.
<?php wp_list_pages(); ?>
Listing Specific Pages
As with many WordPress functions, the wp_list_pages function takes several parameters.
For example, the include parameter allows you to list specific pages by referencing their page IDs, separated by commas (,). The following example will only list two pages (the pages have IDs of 4 and 5).
<?php wp_list_pages('include=4,5'); ?> Excluding Specific Pages from a List
You can also exclude specific pages using the exclude parameter:
<?php wp_list_pages('exclude=4,5'); ?> Sorting Pages
As discussed earlier, the default sorting order of wp_list_pages is alphabetical.
You can, however, change the order of the listing using the sort_column parameter. The sort_column parameter can have 1 of 7 values:
post_title– Sort alphabetically (default value)menu_order– Sort by page orderpost_date– Sort by date of creationpost_modified– Sort by time last modifiedID– Sort by page IDpost_author– Sort by the page author IDpost_name– Sort alphabetically by post slug
Here is the code for sorting by creation date instead of the default alphabetical order:
<?php wp_list_pages('sort_column=post_date'); ?>Specifying the Depth
Pages can have subpages, and subpages can have subpages. What if you only wanted to list top-level pages but exclude their subpages? Controlling the depth works great when using it to generate dropdown menus with submenus.
You can use the depth parameter like so:
<?php wp_list_pages('depth=1'); ?> Enabling WordPress 3.0’s Navigation Menu Feature
If you’re wanting absolute control over your navigation, using WordPress 3.0’s new menu function, wp_nav_menu, is the way to go. With this function, you can add categories in menus, submenus and even insert external links into navigation menus. To take advantage of the built-in navigation menu functionality, first you need to enable it in your theme.
In your functions.php file located in the theme directory, you’ll need to add the following:
<?php add_theme_support( 'menus' ); ?>
Next, place the following code in the location where you want the menu to show on your site (this could be in your standard theme template files such as header.php or single.php):
<?php wp_nav_menu( array('menu' => '[Menu Name]' )); ?> Replace [Menu Name] with what you want your menu to be named. You’ll then need to navigate to Appearance > Menus and create your menu with the same exact name. Everything from there is simply drag and drop!
Displaying Blog Information
We’re moving on to getting and working with information about the blog. WordPress has a function for getting and printing your WordPress blog information called bloginfo. This is a good function to use for themes that will be used in multiple domains.
There are many parameters you can use for bloginfo; to find all of them, read the bloginfo WordPress Codex documentation.
Getting the Site’s URL
Let’s say your site’s URL is http://example.com. If you want to print this out in the source, you can use the url parameter.
<?php bloginfo('url'); ?> This works great for absolute link references. For example, if you wanted to reference your logo (let’s say the file name is logo.png) that is in a directory called images, you would do the following:
<img src="<?php bloginfo('url'); ?>/images/logo.png" />The above outputs:
<img src=" ; />
Getting the URL to the Current Theme
To grab the current theme directory’s URL, you can use the template_url parameter. This makes your WordPress themes more flexible so that when you change the domain name or use it in multiple domain names you don’t have to worry about changing anything that references the theme’s location.
You can use this parameter a number of ways, such as for referencing custom external stylesheets, images, and JavaScript libraries that are inside the theme directory.
<?php bloginfo('template_url'); ?> Getting the URL of Your RSS Feed
The bloginfo function can also be used for getting other URLs. For example, if you want to grab the RSS feed URL for your site, you can use the 'rss2_url' parameter:
<?php bloginfo('rss2_url'); ?> If you wanted to create a link to your RSS feed, you could use the following:
<a href="<?php bloginfo('rss2_url'); ?>">Link to RSS feed</a>Working with Content
The WordPress loop is used to display your posts.
A basic loop looks like this:
<?php if ( have_posts() ) : while ( have_posts() ) : the_post(); ?> <?php endwhile; endif; ?>
Not much to look at right now, but it’s what’s going to go inside the loop that really matters.
Querying Posts
First, let’s look at the most important function that goes inside the loop called query_posts. query_posts only needs to be used if you want to display information from another page, post or category than the one the user is currently on.
For example, on the front page (controlled by index.php, home.php, or front-page.php theme template files) you could use query_posts to show the three newest posts in the hypothetical category called Featured. You use query_posts not only to show different kinds of content, but how much content matches the query as well.
Displaying Posts in a Category
Keeping with our Featured category example above, here’s how we’d show the three newest posts from the Featured category:
<?php query_posts('category_name=Featured&posts_per_page=3'); ?>Aside: Passing Multiple Parameters into Functions
Notice that we passed two parameters into the query_post function.
The parameters we passed were category_name and post_per_page. In functions with more than one parameter, you can pass multiple parameters all at once by separating them with an ampersand (&). You can pass as many parameters as you want.
Doing so allows you to increase the specificity of your desired outputs.
Excluding Posts
Similar to wp_list_pages, query_posts has a way to exclude items from being displayed. To do so, you just place a minus character (-) in front of the ID of the items you want to exclude.
For example, let’s say you would like to list all posts except posts from two categories with category IDs of 97 and 34. You could use the cat parameter (which is typically used to display only posts within certain categories) for query_posts:
<?php query_posts('cat=-97,-34'); ?> Displaying Common Information
Now let’s move on to some more functions we can use inside the loop. Many of these functions can only be used inside the loop and may not work if used outside of it.
Display the title of the post:
<?php the_title(); ?>
Display the URL of the post:
<?php the_permalink(); ?>
Display the content of the post:
<?php the_content(); ?>
Display the excerpt of the post:
<?php the_excerpt(); ?>
Display the category of the post:
<?php the_category(); ?>
Display the tags used in the post:
<?php the_tags(); ?>
Display the time the post was published (uses PHP date formatting as a parameter):
<?php the_time(); ?>
Working with Custom Fields
One of the most powerful functions that WordPress has that seems to take developers a long time to learn is the use of custom fields. Custom fields allow users to add custom name/value pairs typically used for post metadata. For example, users can add a post_thumbnail_url key that has a URL value pointing to the thumbnail image.
Users can add custom fields while they are creating posts and pages in Posts > Add new or Pages > Add new. 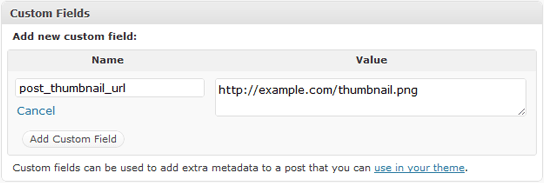 I’ve used custom fields for everything — from post thumbnails and changing the background of the individual post to adding custom link and layout areas. It becomes very powerful once you’ve learned it properly.
Getting custom fields can be done from inside or outside of the loop. If you use it outside the loop, you have to reference the ID of the post or page you want the custom field name/value pair from.
Using Custom Fields to Display Image Thumbnails
Let’s say you want to display an image thumbnail in a post.
First, you must create a new post (Posts > Add new). Under the Custom Fields fieldset, type Thumbnail into the Name field and a URI for the Value field. Then publish the post.
Wherever in the loop you want the URI to be displayed, simply use the echo statement to output the result of get_post_meta (which is a function for getting custom fields).
<?php echo get_post_meta($post->ID, 'Thumbnail', true); ?>
To use get_post_meta outside the loop, change $post->ID to the ID of the post. For example, here’s how to print the URI of the thumbnail image for the post with ID of 6.
<?php echo get_post_meta(6, 'Thumbnail', true); ?>
Since we want to display an image, what we actually need to do is use the echo statement inside the src attribute of an img element:
<img src="<?php echo get_post_meta(6, 'Thumbnail', true); ?>" />
The code from above should output the following:
<img src="/images/thumbnail.jpg" />
Related Content
-
 President of WebFX. Bill has over 25 years of experience in the Internet marketing industry specializing in SEO, UX, information architecture, marketing automation and more. William’s background in scientific computing and education from Shippensburg and MIT provided the foundation for MarketingCloudFX and other key research and development projects at WebFX.
 -

WebFX is a full-service marketing agency with 1,100+ client reviews and a 4.9-star rating on Clutch! Find out how our expert team and revenue-accelerating tech can drive results for you! Learn more
Make estimating web design costs easy
Website design costs can be tricky to nail down. Get an instant estimate for a custom web design with our free website design cost calculator!
Try Our Free Web Design Cost Calculator
Share this article


Web Design Calculator
Use our free tool to get a free, instant quote in under 60 seconds.
View Web Design CalculatorMake estimating web design costs easy
Website design costs can be tricky to nail down. Get an instant estimate for a custom web design with our free website design cost calculator!
Try Our Free Web Design Cost Calculator


