
 In this web design tutorial, you’ll find a way to create a 3D space/futuristic gallery layout with Photoshop. We cover several methods such as drawing with the Rectangular Marquee Tool and using the Perspective Transform Tool.
Update
Editor’s note (Jacob Gube): I’m sorry to announce that the second part of this tutorial won’t be published. We had quality concerns with the second part of this tutorial series.
We attempted to fix the second tutorial but couldn’t get it to a point where I was comfortable in publishing it on the site. In the future, I’ll more thoroughly review, test, debug and ensure follow-up tutorials are publishable before I publish the first part of the tutorial. This two-part tutorial series will show you how to create the layout in Photoshop, and then how to convert the design into a fully functional web template that uses standards-based HTML/CSS and jQuery in the second part.
Download the source file
Feel free to download the source file so that you can study it, though we encourage you to hold off on doing so until you complete the tutorial so that you can compare your work with the provided Photoshop file.
- 3d-space-futuristic-gallery-psd.zip (ZIP, 0.23MB)
Final result
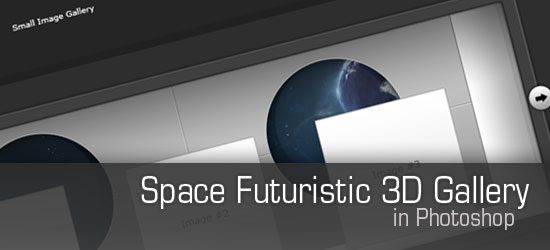
Below, you’ll see a preview of the design we hope to achieve in the end. Click on the image to view the full-scale version of the 3D space/futuristic image gallery.  Let’s begin the tutorial, shall we?
Setting up the Photoshop canvas
1 Let’s setup our working area. Create a new Photoshop document, File > New (Ctrl + N) with width of 955px and a height of 600px. 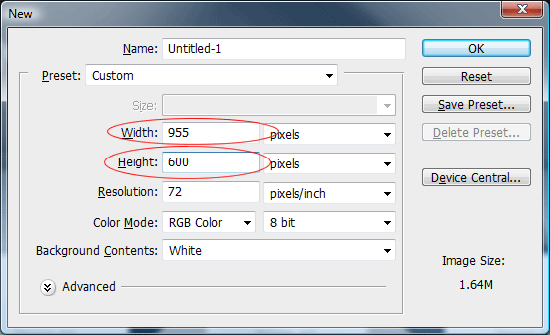 2 In the Layers Panel, choose your Background layer, and fill your background layer via Edit > Fill (Shift + F5).
Use a color value of #2E2E2E.
Creating the floor of the gallery
3 Create a layer on top of the Background layer. 4 Choose the Rectangular Marquee Tool (M) from the Tools Panel and create a rectangular selection with a width of 816px and a height of 60px.
If you want, to make this precise selection easier, under the Rectangular Marquee Tool options, under Style, choose Fixed Size and set the appropriate width and height values. 5 Fill in your rectangular selection with a white (#FFFFFF) color using Edit > Fill (Shift + F5). View the following figure to check your work.
 6 Now, we’ll add a gradient overlay on the white rectangle. To do so, we’ll add it as layer style. Right-click on the white rectangle layer in the Layers Panel, and then choose Blending Options to open the Layer Styles dialog box.
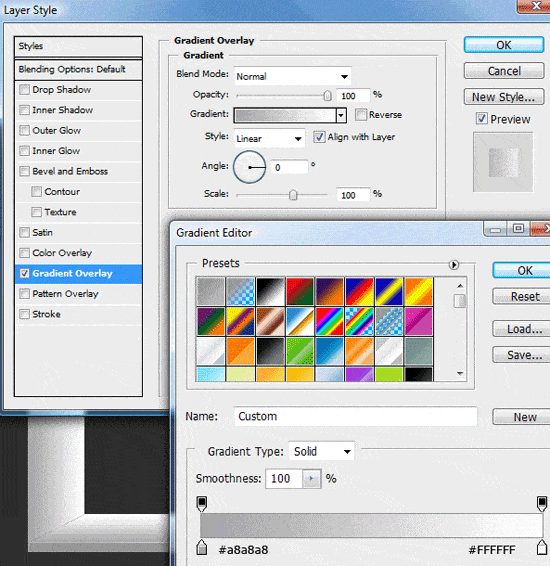
7 Check the box beside Gradient Overlay to add the layer style, and use the values shown in the following figure. 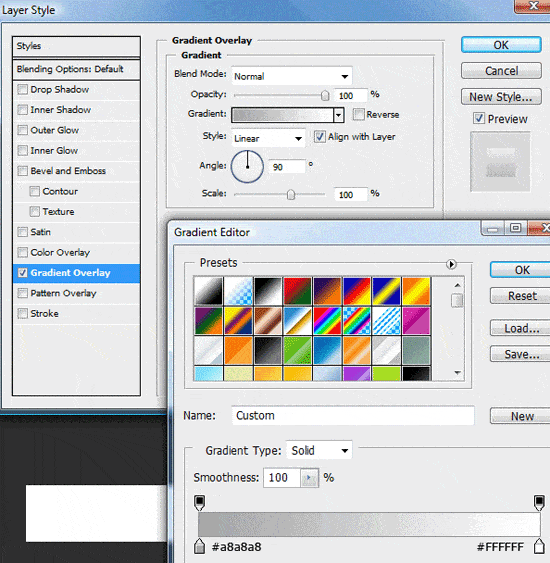 8 With our layer styles in place, we’ll alter the rectangle’s perspective. Choose Edit > Transform > Distort.
This will display transform controls around the rectangle; using the top and middle transform controls, alter the perspective by dragging the controls on the canvas. Use the following figure as a guide on how to alter the perspective. 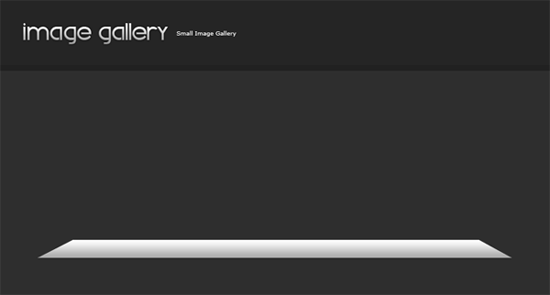 9 Create a marquee selection around the transformed rectangle by holding down the Ctrl key and then clicking on it’s layer’s thumbnail in the Layers Panel.
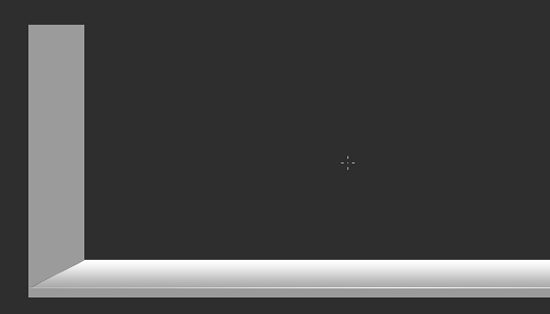
Doing so should load a marquee selection around the object (as shown in the following figure). 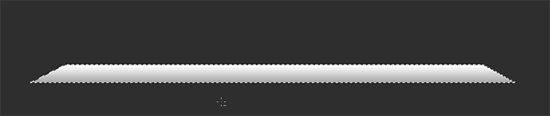 10 Create a new selection that will contain the stroke around the selection. Use Edit > Stroke to add a black stroke around the selection.
Use the settings in the following figure, with a black color (#000000). 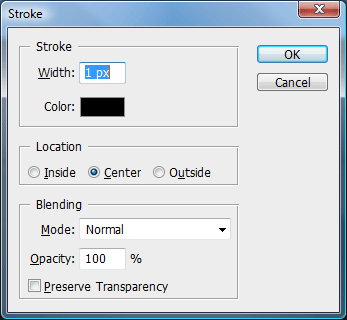 11 Choose the Rectangular Marquee Tool (M) from the Tools Panel and create a selection around the rectangle, but leave out the bottom border. Check out the following figure as a guide on how to make this selection.
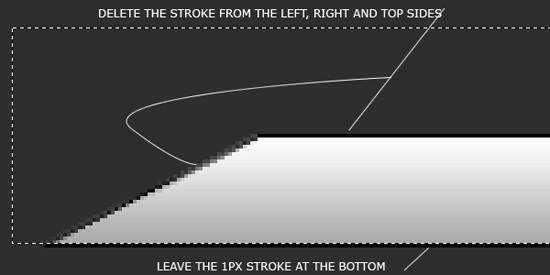 12 Delete the borders/stroke by choosing Edit > Clear or pressing the Del key. This will leave just the bottom border (which is what we want). 13 Choose the layer with the bottom border in your Layers Panel, and add a Gradient Overlay layer style by double-clicking on the layer’s thumbnail or right-clicking on it, and then choosing Blending Options to open up the Layer Style dialog box.
Use the values in the following figure.  14 Check your work, you should have something like the following figure.
  15 Directly underneath your 1-pixel bottom border, make a rectangular selection using the Rectangular Marquee Tool (M).
Make the selection such that it spans the entire width of the bottom border, and have a height of about 10px. Use the following figure as a guide on how to create this selection.  16 Use Edit > Fill (Shift + F5) to fill the selection with a color of #9B9B9B.
17 Check your work, it should look like the following figure. 
Making the walls of the gallery
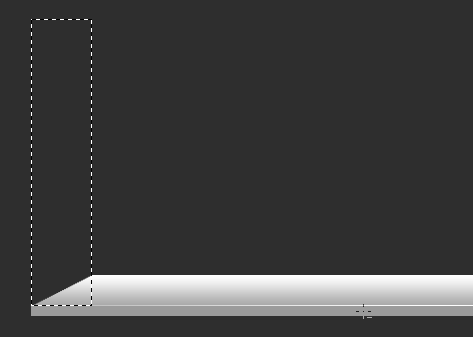
18 Now, we’re going to create the sides of our 3D space/futuristic gallery. Choose the Rectangular Marquee Tool (M) from your Tools Panel, and create a selection on the left-hand side of the floor, using the subsequent figure as a guide on how to create this selection.
 19 Create a new layer on top of the floor layer. Fill in the selection with any color using Edit > Fill (Shift + F5). 20 Click on the floor layer while holding down the Ctrl key to load a selection around it.
21 Make sure that the active layer is the newly created layer on Step 19. Invert the selection you made from Step 20 using Select > Inverse (Shift + Ctrl + I). 22 Delete the area underneath the inverted selection using Edit > Clear or by pressing the Del key. 23 To make sure you did the preceding steps correctly, check your work against the subsequent figure.
 24 Now, we’ll add a Gradient Overlay layer style on the left wall layer. Double-click on the layer’s thumbnail to open up the Layer Styles dialog box. Use the following figure as a guide on how to set the options and values of the Gradient Overlay.
 25 Now, we add a stroke to the left-hand wall, just as we did with the floor. Load a selection around your wall by clicking its layer’s thumbnail in the Layers Panel whilst holding down the Ctrl key on the keyboard. 26 Create a new layer above your wall layer.
On this new layer, Choose Edit > Stroke to add a stroke using the same settings as in Step 10. 27 Add a Color Overlay layer style by double-clicking on the layer to open up the Layer Style dialog box. Use the following figure as a guide on how to adjust the settings of the color overlay, use #808080 as the color. 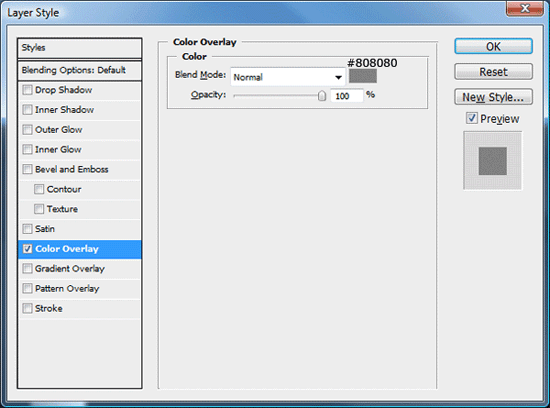 28 Just like the floor, we remove some parts of the border we created but this time, we only remove the bottom and right border stroke.
See the following figure to preview what we’ll be doing in the succeeding steps. 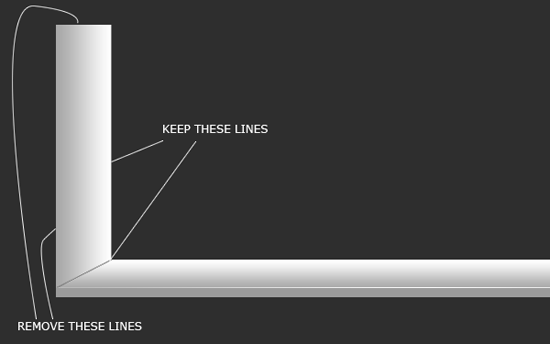 29 First, create a new layer on top of all the other layers thus far. On the left-hand side of the wall, choose the Rectangular Marquee Tool (M) to create a 10px wide selection from the top to the bottom of the frame (see the figure below as a guide).
 30 Choose Edit > Fill to fill in the newly created selection with a gray color (#9B9B9B). You should have something like the following figure.
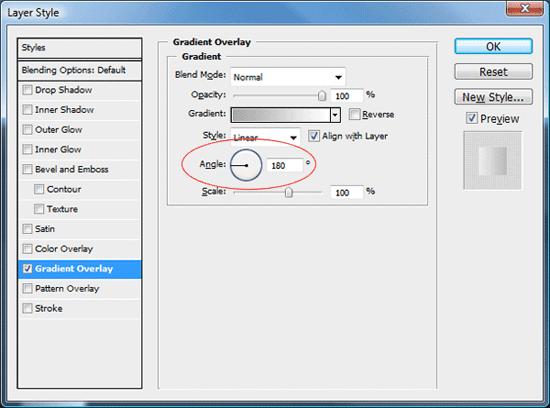
 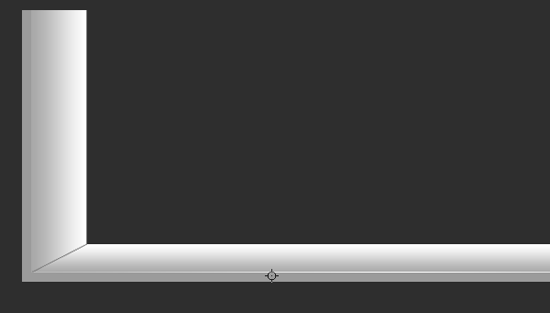 31 Repeat Steps 18 – 30 for the right-hand side wall, but, to keep our lighting and shadow accurate, when adding the gradient overlay shown on Step 24, use 180 degrees as the Angle value (see the following figure).
 32 Make sure that you’re keeping up by checking your work against the following figure.
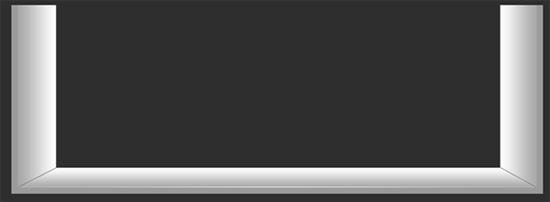
Adding inset dividers onto the floor
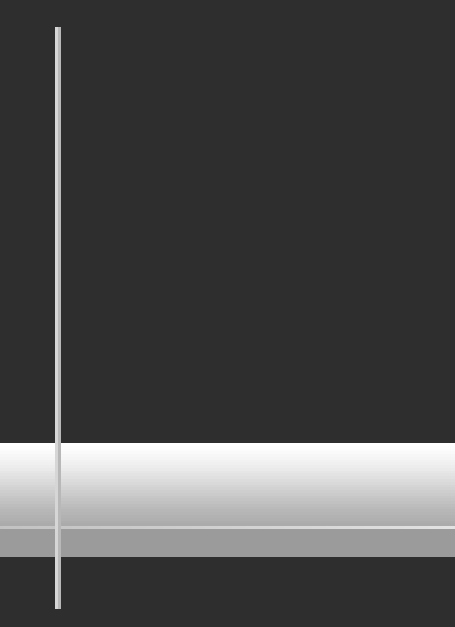
33 We will divide the floor panel into several sections; when we place our images on here later on, they’ll help delineate each thumbnail image. To start, choose the Rectangular Marquee Tool (M) from the Tools Panel and create a tall 1px wide selection on top of the floor of our space/futuristic 3D gallery.
The height of the selection isn’t important – just make sure that it’s significantly taller than the floor of image gallery. 34 Create a new layer. With your 1px wide marquee selection still active, fill in the area using Edit > Fill (Shift + F5) with a shade of gray (#D6D6D6).
35 With the selection still active, move the 1px wide selection 1px to the right using your right arrow key. Fill in this area beneath the selection with a shade of gray, #B8B8B8. 36 See if you did the previous steps correctly by checking your work against the following figure.
 37 Duplicate this 2px line into another layer. Do to so, with the current layer still active in the Layers Panel, switch to the Move Tool (V) in the Tools Panel. Hold down the Alt key, and then press the right arrow key.
This will duplicate the line into another layer, moved to the right by 1px (or your default movement increment). 38 Now, we’ll move this duplicated line to the right about 100px. To do so, still with the Move Tool (V) active, hold down the Shift key and press the right arrow key 10 times; with the Shift key held down, the movement increment should change from only 1px to 10px.
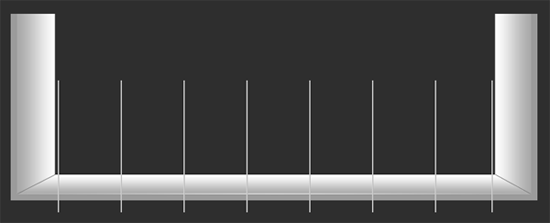
39 We create more inset dividers by repeating Steps 37 – 38. When you’re done, you should end up with something like the following figure. Notice how all the lines have the same gap/spacing in between them. Also, notice that the gap/space between the left wall and the first divider, and the right wall and the last divider is equal.
 40 Let’s tidy up a bit by merging all of the inset divider layers. Do so by right-clicking on the topmost layer and choosing Merge Down (Ctrl + E). Keep merging down until you only have one layer for all the inset dividers.
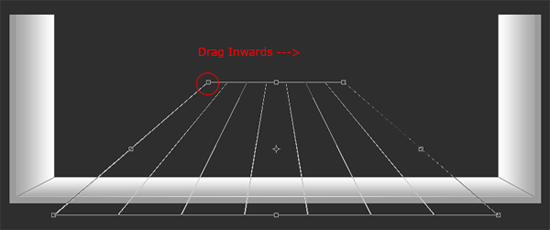
41 Now, we’ll transform the perspective of our inset dividers so that they follow the 3D orientation of our gallery. Choose Edit > Transform > Perspective, and drag the top-right transform control inwards. Use the following figure as a guide on how to transform the perspective of our inset dividers.
 42 Load a selection around your floor (again) by holding down the Ctrl key and clicking on the layer’s thumbnail in the Layers Panel. 43 Switch back to your inset divider layer, make sure it’s the active layer in the Layers Panel. 44 Invert the current selection by choosing Select > Inverse (Shift + Ctrl + I).
45 Delete the area underneath the inverted selection by choosing Edit > Clear or hitting the Del key. This removes the excess parts of the inset dividers (see the following figure on how they should look like now). 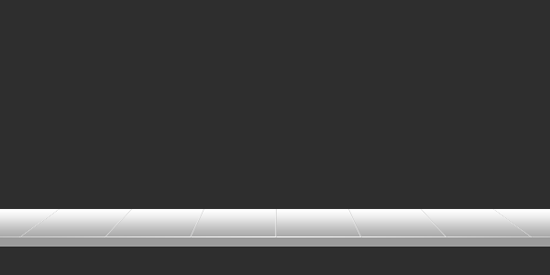
Creating the background of the gallery
46 First create a new layer underneath all of the layers thus far (a layer above the Background layer).
47 Choose the Rectangular Marquee Tool (M) from the Tools Panel and make a selection on the newly created layer, using the following figure as a guide on how to make the selection. 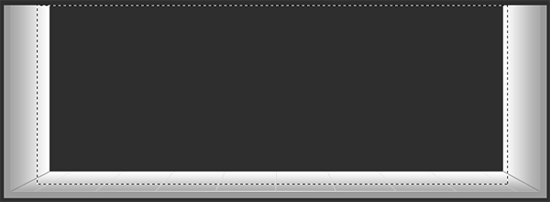 48 With the selection created, fill the area underneath the selection by choosing Edit > Fill (Shift + F5); use any color because we’ll be adding a gradient overlay that will cover up any color you choose. 49 Open up the Layer Styles dialog box to add a Gradient Overlay; do so by double-clicking on the layer’s thumbnail.
The left color stop of the color gradient is a gray color (#9B9B9B) and the right color stop of the gradient has a slightly lighter shade of gray (#D5D5D5). View the subsequent figure to see what settings should be used for this gradient overlay. 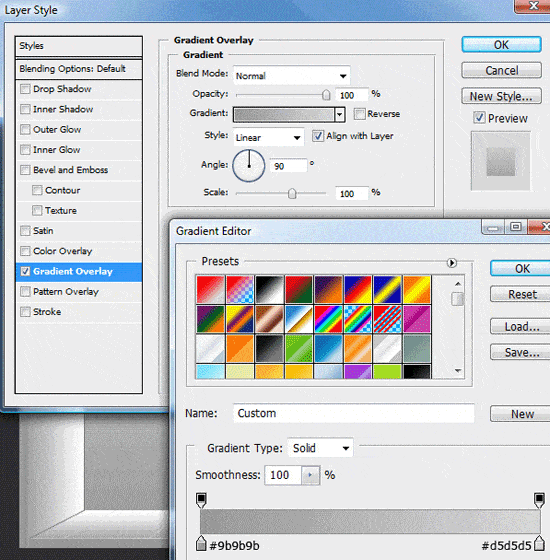 50 Confirm with the following figure that you’re still on track, you should have something like this:
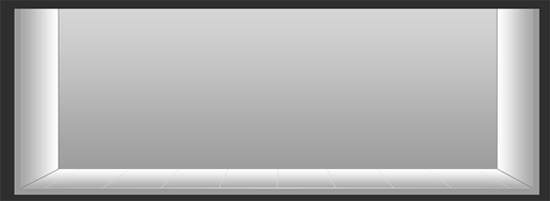
Making the rounded windows on the background of the gallery
51 We’ll make it look like there are windows you can look out of.
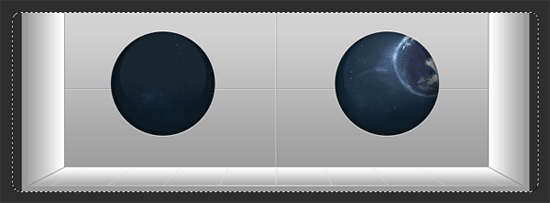
Create a new layer on top of the gallery’s background. Choose the Elliptical Marquee Tool from the Tools Panel (or if you want, choose the Ellipse Tool instead). Create a perfect circle by holding down the Shift key whilst dragging the Elliptical Marquee Tool onto the canvas.
52 Choose Edit > Fill (Shift + F5) to fill in the circle with any color; it doesn’t matter what color you choose because we’re going to put something on top of it very soon. 53 Create a new layer and then make another circle beside the other one you just created, making it identical to the other one. Alternatively, just duplicate the other layer (by right-clicking on it, and then choosing Duplicate Layer) and then use the Move Tool (V) to position it accordingly.
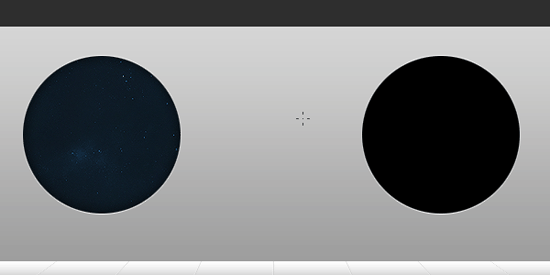
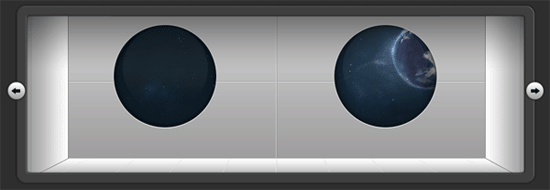
You should have something like the following figure now. 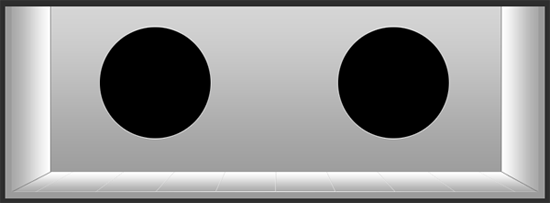 54 To make our gallery look like it’s in outer space, we’ll use a stock image provided by James Oliver of deviantArt called: Earth. Go over to the Earth page and copy the image to your clip board.
55 Create a selection around the first circle by holding down the Ctrl key and then clicking on its layer’s thumbnail. 56 Paste the image from your clipboard into the circular marquee selection by choosing Edit > Paste Into (Ctrl + Shift + V). 57 Choose the Move Tool (V) from your Tools Panel and use your mouse to position the background inside the window (for more precise movements, use your arrow key).
 58 Repeat the two previous steps for the right window.
 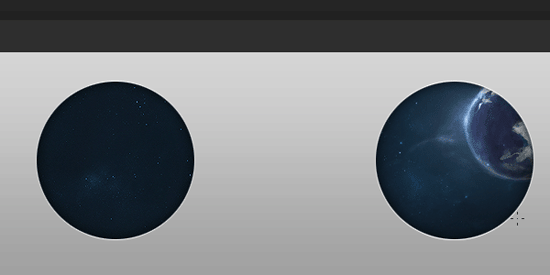 59 By performing the above steps, you’ll notice that there are now layer masks on top of each circle layer. Right-click on the layer’s mask, and then choose Apply Mask.
60 Create a marquee selection around the entire Photoshop canvas by choosing Select > All (Ctrl + A). 61 Now, choose Edit > Crop to crop the canvas to the selection. Doing this gets rid of any parts of the stock photo hiding beyond the edge of our Photoshop canvas.
62On our circle/window layers, we’ll add two layer styles: Inner Shadow and Stroke. See the following figures for the settings of these layer styles. The following figure displays the settings for the Inner Shadow layer style:  The following figure displays the settings for the Stroke layer style:
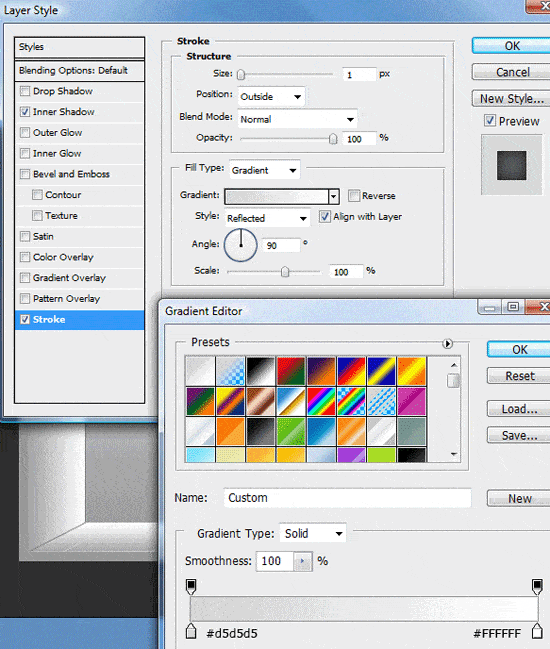
Adding a shine to the windows for realism
63 Using the Elliptical Marquee Tool (or the Ellipse Tool), create a perfect circle inside one of our circular windows (hold down the Shift key).
64 Create a new layer, and with the new selection still active, choose Edit > Fill (Shift + F5) and fill the area underneath the selection with a white color (#FFFFFF). 65 Add a layer mask by clicking on the Add layer mask icon on the bottom of the Layers Panel. 66 Choose the Gradient Tool from the Tools Panel, and make sure that the gradient style is set to Linear Gradient in its Options bar.
67 With your mouse, apply the linear gradient on the layer mask from the bottom of the circle to about halfway of the circle. 68 Lower the opacity of this layer to suit your tastes. 69 Repeat Steps 63 – 68 for the other circular window.
This should add a shine on the windows, to make them look realistic (see the following figure to check up on your work thus far). 
Creating inset dividers in between the circular windows
70 We are now going to add vertical and horizontal inset dividers onto our gallery background so that the background looks like they’re panels on a futuristic spaceship. To start, choose the Rectangular Marquee Tool (M) from the Tools Panel.
71 With the Rectangular Marquee Tool chosen, create similar inset dividers that we did earlier in the tutorial: as a refresher, head back up to Steps 33 – 36 under a previous section called ” Adding inset dividers onto the floor”. Use the following example as a guide. 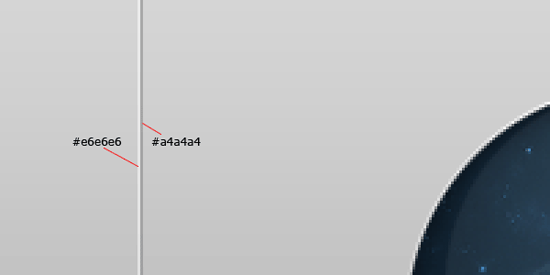 72 Create the first line vertically, in the middle of the two circular windows. Then, create another line horizontally.
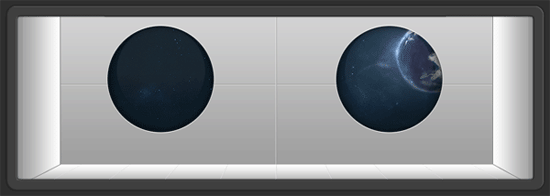
You should have something like the following figure. 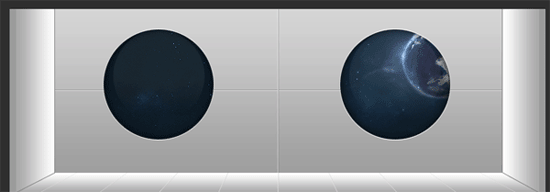
Sealing up our 3D space/futuristic gallery
73 We are now going to close up our room around the edges so that it looks like a real room. To start, choose the Rounded Rectangle Tool from the Tools Panel.
In the Options bar of the Rounded Rectangle Tool, set the Radius value to 15px. 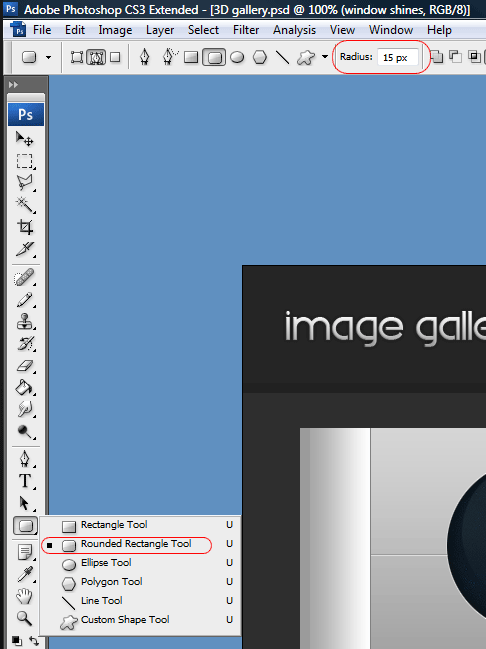 74 Create the rounded rectangle shape onto the canvas such that it covers the entire room area. Notice that in the following figure, the rounded corners hang over a bit to the left and right.
 75 Create a new layer and fill in the rounded rectangle with any color, it doesn’t matter what color you choose because it’ll be covered up layer styles. 76 On our rounded rectangle layer, we’re going to add four layer styles: a Drop Shadow, a Bevel and Emboss, a Color Overlay, and a Stroke. Please refer to the subsequent figures to get the settings that should be applied for each layer style.
The following figure is for the Drop Shadow layer style: 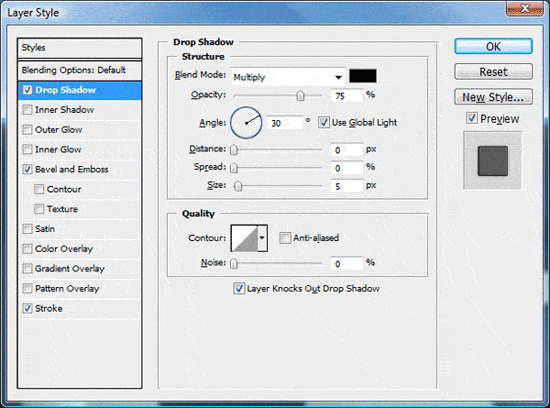 The following figure is for the Bevel and Emboss layer style:
 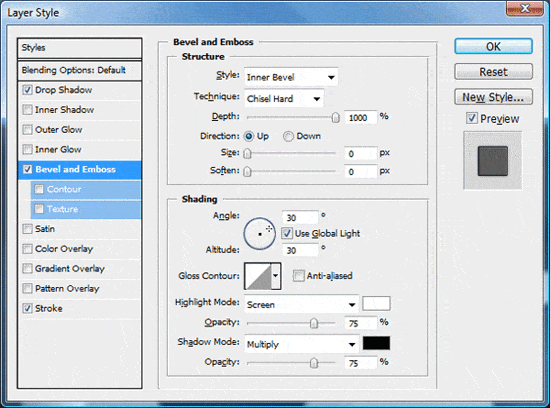 The following figure is for the Color Overlay layer style:
 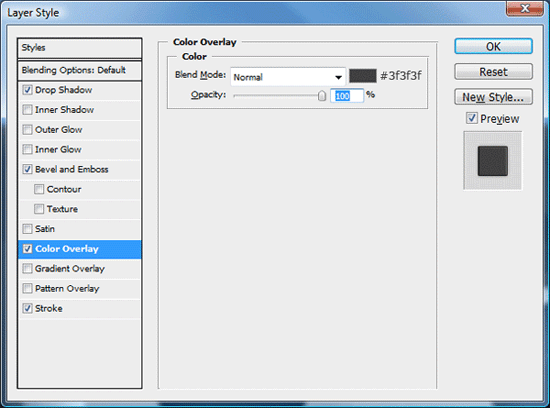 The following figure is for the Stroke layer style:
 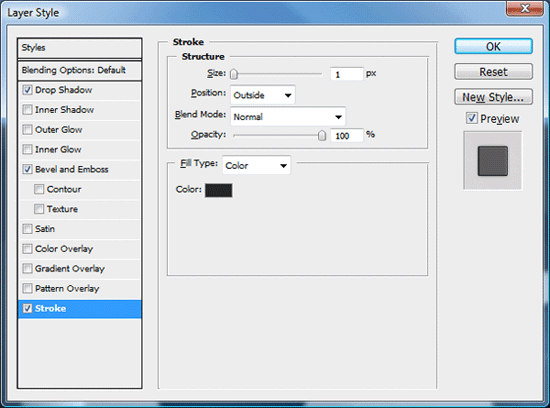 77 We’ll finish the gallery’s edge. First, create a marquee selection around your rounded rectangle layer by holding down the Ctrl key and then clicking on the layer’s thumbnail; this will load the appropriate selection. 78 Next, we shrink the marquee selection by choosing Select > Modify > Contract.
We contract the selection by 8 pixels. 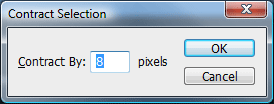 79 Now, we delete the area underneath the contracted marquee selection by choosing Edit > Clear or pressing the Del key. After deleting the selected area, see if your work resembles the following figure.
Adding shadows to the gallery for realistic lighting effects
80 We want to make our lighting and shadows as realistic as possible to really give the design a three-dimensional look. To start, choose the Rectangular Marquee Tool from the Tools Panel and create a rectangular selection using the following figure as a guide.  81 Next, create a new layer underneath the gallery’s border, but above all of the other layers.
82 Set your foreground color in the Tools Panel to black (#000000). 83 Choose the Gradient Tool from the Tools Panel, and in the Options bar, choose the Foreground to Transparent color gradient, and choose Linear Gradient as the gradient style. 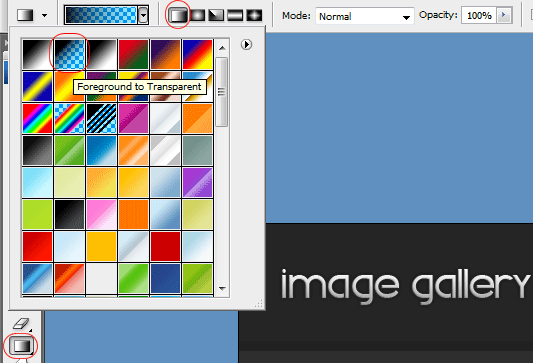 84 Make sure the marquee selection you made on Step 80 is still there, and also that the active layer on the Layers Panel is the newly-created layer.
Create the linear gradient by dragging your mouse from the top of the gallery, to the bottom, and inside toward the middle of the marquee selection. 85 Lower the opacity of this layer down to the about 60%. This layer is now our shadow layer.
Check the following figure to see if you were able to create the shadow accurately. 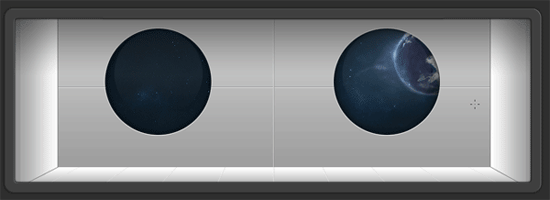
Designing the left and right arrow buttons
86 The images in our gallery will move left and right. To allow the user to move through the image thumbnails, we’ll need to give them left and right controls.
To start, create a small circle on the left side and on top of your rounded rectangle border layer using the Elliptical Marquee Tool in the Tools Panel. 87 Fill the circle with any color by choosing Edit > Fill (Shift + F5). 88 Now, we’ll add four layer styles: a Drop Shadow, a Bevel and Emboss, and Gradient Overlay, and a Stroke.
Refer to the subsequent figures for the settings of these layer styles. The following figure shows the settings for the Drop Shadow layer style: 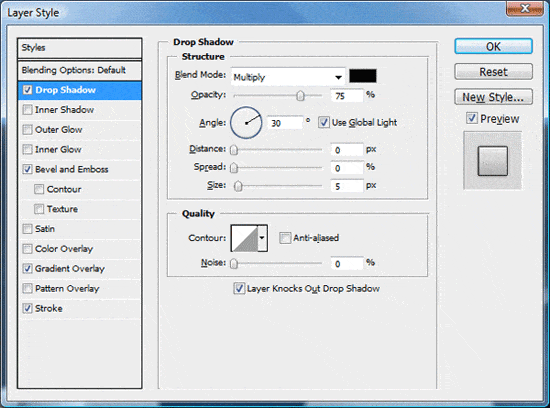 The following figure shows the settings for the Bevel and Emboss layer style:
 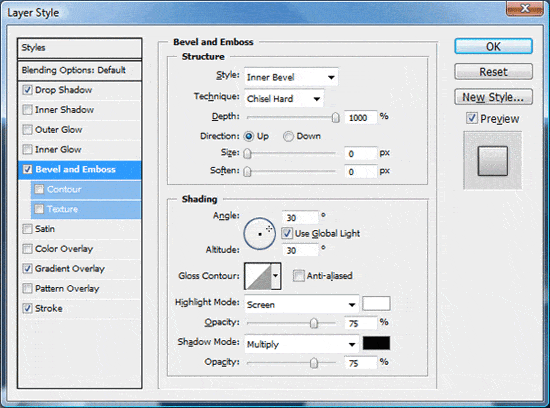 The following figure shows the settings for the Gradient Overlay layer style:
  The following figure shows the settings for the Stroke layer style:
 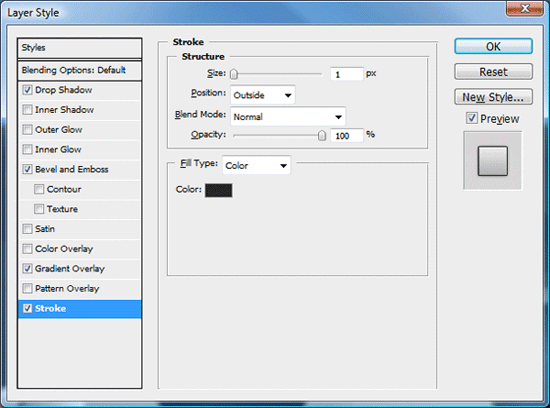 89 Check your work against the following figure; it should look something like this:
 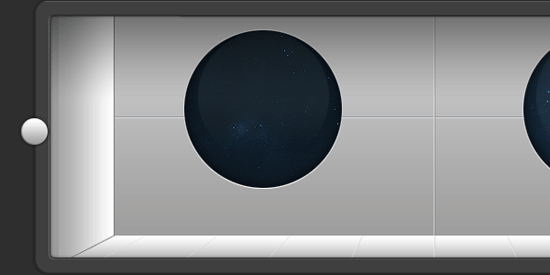 90 Now, we’ll add a leftward pointing arrow onto it. We do this by using the Custom Shape Tool in the Tools Panel.
In the Options bar, choose Arrow 9 under Shape. 91 To create the right arrow, we simply duplicate the circle layer and the arrow custom shape layers. First, choose both layers in the Layers Panel by holding down Ctrl while clicking on each layer.
Then, right-click on the Layers Panel and choose, Duplicate Layers. 92 With the duplicated layers still the active layers in the Layers Panel, choose Edit > Transform > Flip Horizontal to reorient the layers to point to the right. 93 With the Move Tool (V), move the rightward pointing arrow across the room, to the opposite of the leftward pointing arrow.
Creating the gallery’s thumbnails
94 Choose the Rectangular Marquee Tool (M) from the Tools Panel, create a new layer, and then create a square inside the room. 95 Fill this marquee selection with any color by choosing Edit > Fill (Shift + F5).  96 Now, we’ll apply two layer styles onto the thumbnail layer: a Gradient Overlay and a Stroke.
Use the following figures as a guide on the layer styles’ settings. The following figure displays the settings for the Gradient Overlay layer style: 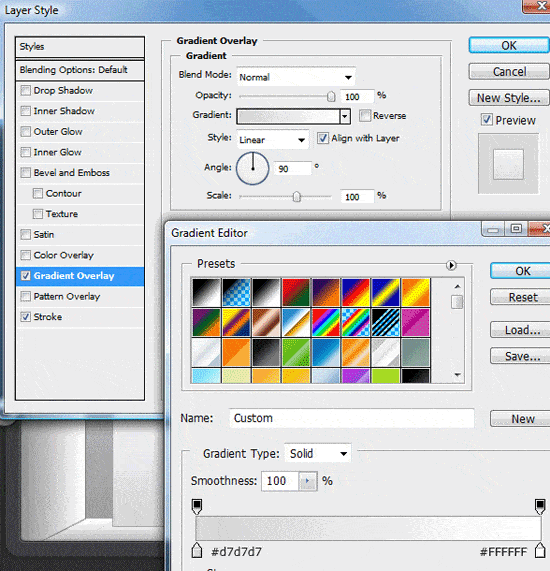 The following figure displays the settings for the Stroke layer style:
 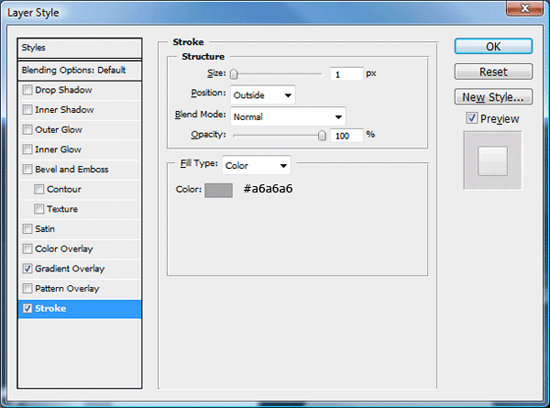 97 Check your image thumbnail container to see if it looks like the following figure.
 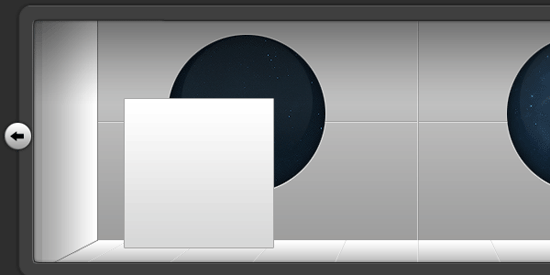 98 Duplicate this layer twice, and then use the Move Tool (V) to move them across the room.
In the following figure, I used the Horizontal Type Tool (T) to add text into it. 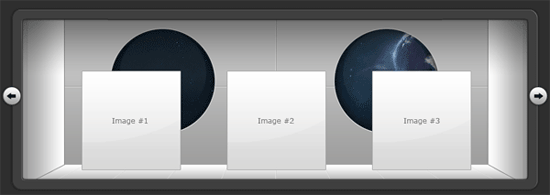
We’re done!
If you managed to follow along, give yourself a pat on the back – that was one long tutorial, wouldn’t you say?
The final result
If everything went well, this is what your web layout should look like.
Click on the image below to see the full-scale version of the 3D space/futuristic image gallery.
Stay tuned for Part 2: making a jQuery-powered image gallery!
In the follow-up tutorial, which we hope to post next week, I’ll be showing you how to convert this image gallery layout into a fully functional HTML/CSS template, which we will then animate with the help of jQuery. To make sure you don’t miss the follow up tutorial, you have to subscribe to the Six Revisions RSS feed, which will let you know as soon as the follow-up tutorial is posted!
The “Space Futuristic Gallery” Tutorial series
This two-part tutorial series will show you how to create the layout in Photoshop, and then how to convert the design into a fully functional web template that uses standards-based HTML/CSS and jQuery in the second part.
- Part 1: How to Design a Space Futuristic Gallery Layout in Photoshop
Part 2: How to Make a Space Futuristic Image Gallery with jQuery
Post your questions in the comments
If you found any trouble, difficulty, or errors in the tutorial – please leaves us a note in the comments – we’ll try to help you the best way we can!
Related content
- Create a Slick and Accessible Slideshow Using jQuery
- How to Create a 3D Text Photo Manipulation
- How to Create an Illustrative Web Design in Photoshop
-
 President of WebFX. Bill has over 25 years of experience in the Internet marketing industry specializing in SEO, UX, information architecture, marketing automation and more. William’s background in scientific computing and education from Shippensburg and MIT provided the foundation for MarketingCloudFX and other key research and development projects at WebFX.
 -

WebFX is a full-service marketing agency with 1,100+ client reviews and a 4.9-star rating on Clutch! Find out how our expert team and revenue-accelerating tech can drive results for you! Learn more
Make estimating web design costs easy
Website design costs can be tricky to nail down. Get an instant estimate for a custom web design with our free website design cost calculator!
Try Our Free Web Design Cost Calculator
Share this article


Web Design Calculator
Use our free tool to get a free, instant quote in under 60 seconds.
View Web Design CalculatorMake estimating web design costs easy
Website design costs can be tricky to nail down. Get an instant estimate for a custom web design with our free website design cost calculator!
Try Our Free Web Design Cost Calculator


