

Web performance is an essential element of the user experience. In the first part of this series, I talked about a method for automating some tasks related to web performance optimization. Here, in the second part of the series, we will go over some slightly more advanced techniques for improving front-end web performance.
This is what we will talk about: Optimizing the HTML structure
- Referencing JavaScript and CSS files at the bottom
- Dealing with flash of unstyled content (FOUC)
- Inlining CSS and JavaScript
Server configuration
- Browser caching
- How long should files be cached?
- How to override caching
- Data compression
After applying all of these optimizations on my site, I was able to get a perfect (100/100) PageSpeed Insights score for both mobile and desktop web performance analyses.
Optimizing the HTML Structure
For a long time, I thought that my external CSS and JavaScript references should be inside the <head> tags. Referencing JS and CSS resources at the start of HTML documents made sense to me because I need this stuff for my web pages to look and function properly. But having script and link elements at the start of the HTML document can block the render of the page, meaning the browser won’t process and display any subsequent HTML element until the resources have been downloaded and processed.
Many JavaScript files, especially those written with asynchronous programming in mind, often don’t need to be referenced inside the <head> tag and can be loaded further down the HTML document so that they don’t block the browser from rendering the page content. Referencing CSS files towards the end of the HTML document is a little bit trickier. That’s because when you load CSS files at the end of the document, the user might start seeing the page content without any styles because the style rules from the external stylesheet haven’t been loaded and processed yet.
This situation is called flash of unstyled content (FOUC).
Referencing JavaScript and CSS Files at the Bottom
Whenever possible, we should reference external resources at the bottom of the document. Just before the closing body tag.
<html> <head> ... </head> <body> ... <!-- script and link elements ideally go here --> </body> </html>Dealing with Flash of Unstyled Content
To address the FOUC, what I’ve done is give the body element an inline style attribute of 0% opacity.
<body style=opacity:0>Then, in my external stylesheet, I reset the body element back to 100% opacity.
body { opacity: 1 !important; }When the external stylesheet has been loaded and processed, the content will be displayed. The issue with this technique is if there was a server failure that prevents the CSS file from being downloaded, the user would just see a blank page because of the inline style attribute given to the body element.
Inlining CSS and JavaScript
You can also include CSS style rules within <style> tags and JS scripts within <script> tags right in your HTML documents. This improves page speed because the browser doesn’t need to request and download external resources to render the web page. However, this is only good for small amounts of CSS and JS. Otherwise, the HTML document will increase in file size and your JS and CSS won’t benefit from browser-caching.
For years, we were discouraged from inlining our CSS and JS because it made our projects harder to modularize, scale, and maintain. However, there are now plenty of build tools that can deal with these issues. It’s now recommended that you inline CSS and JS that are essential to rendering your above-the-fold content to enhance the perceived page performance. Below is a script that inlines the style rules from an external stylesheet.
This is based off an example found in PageSpeed Insights docs. The problem with this method of inlining CSS style rules is that your style rules won’t render if the user has JavaScript disabled.
<html> <head> ... </head> <body> ... <script> var cb = function() { var l = document.createElement('link'); l.rel = 'stylesheet'; l.href = 'css/semeano.min.css'; var h = document.getElementsByTagName('head')[0]; h.parentNode.insertBefore(l, h); }; var raf = requestAnimationFrame || mozRequestAnimationFrame || webkitRequestAnimationFrame || msRequestAnimationFrame; if (raf) raf(cb); else window.addEventListener('load', cb); </script> </body> </html>Server Configuration
If you have access to your server configurations, there’s a couple of things you can do to improve site speed: browser caching and data compression.
Browser Caching
Allowing your site files (external stylesheets, JavaScript files, images, etc.) to be cached by the browser means that the files won’t need be downloaded every single time a web page on your site is requested by the user. This can speed up the user’s experience when navigating to another web page because things such as your stylesheet and your web fonts don’t need to be downloaded again since they are already stored in the user’s browser cache. So how do we allow browsers to cache our files?
When the browser asks for a file from our web server, one of the things the server will do is send the file’s HTTP headers. The HTTP headers of a file contains meta-data about the file being requested, as well as directions on how the browser should treat the file. One of the standard HTTP header fields that we can specify is Cache-Control. Cache-Control allows us to define how we want the browser to cache the file.
We can use the Cache-Control header field to tell the browser if it should cache the file, and for how long it should cache the file. As it turns out, on my site, there wasn’t a Cache-Control HTTP header field for SVG files. I’m using the lighttpd module on my server, so I opened its configuration file (lighttpd.conf) and added the following line to set the max-age directive to 1 month.
expire.url = ( "/svg/" => "access plus 1 months" )After restarting my web server, I used Chrome DevTools to inspect the SVG file to make sure my configuration went according to plan.
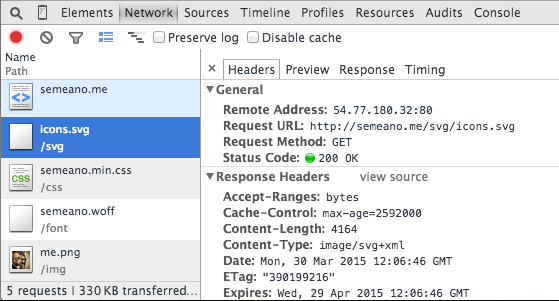 You can see in the Headers tab of DevTools that the
 Cache-Control field now specifies a max-age directive.
Cache-Control: max-age=2592000By the way, max-age is specified in seconds. 2,592,000 seconds = 30 days.
How long should files be cached?
There isn’t a specific rule when it comes to exactly how long your files should be cached, but the best practice is to cache them for as long as possible. Cache duration depends on how frequently you update your site files and the type of file being cached.
For example, you could set a longer max-age for files that don’t change frequently — such as the site’s logo, JS files, and CSS files. For reference, HTML5 Boilerplate has these cache durations (you can see this info in its .htaccess boilerplate):
| File Type | Cache Duration |
|---|---|
| CSS files | 1 year |
| JavaScript files | 1 year |
| Images (e.g. PNG, JPG, GIF, SVG) | 1 month |
| HTML documents | no caching |
Overriding the Browser Cache
If we update a resource before its cache expires, we will need a way to force the browser to re-download the resource.
There are many ways to deal with this situation. One easy way is simply changing the name of the resource and updating our references to it. For example, if we update a file called styles.css, we can rename it to styles.v2.css.
You can use gulp-rev-all to rename a resource whenever it’s changed, because doing this manually is not scalable. Then we’ll also need to update our HTML so that links referencing styles.css now point to styles.v2.css. This is typically done with server-side scripting (like PHP) and/or with your CMS template files so that the update is propagated throughout the entire site. Alternatively, you can use the gulp-rev-replace package for this.
Data Compression
Compressing your files will allow browsers to download them much quicker.
When the browser requests the page resources from your server, the server will tell the browser that that the resources are compressed. The browser will then download the resources, and then uncompress it. One of the most frequently used data compressors on websites is GZip.
Enabling GZip on Apache
For Apache web servers, you can add GZip compression directives in your .htaccess file.
The following set of directives gives instructions about which files should be compressed and which ones shouldn’t. These instructions will only be carried out if the mod_gzip is installed and enabled on your server.
<ifModule mod_gzip.c> mod_gzip_on Yes mod_gzip_dechunk Yes mod_gzip_item_include file .(html?|txt|css|js|php|pl)$ mod_gzip_item_include handler ^cgi-script$ mod_gzip_item_include mime ^text/.* mod_gzip_item_include mime ^application/x-javascript.* mod_gzip_item_exclude mime ^image/.* mod_gzip_item_exclude rspheader ^Content-Encoding:.*gzip.* </ifModule>Alternatively, you can use Apache’s mod_deflate module.
Enabling GZip on nginx
If you’re on a nginx server, below are GZip data compression directives that can be placed in your server’s configuration file. (The following relies on the nginx’s HttpGzipModule.)
gzip on; gzip_comp_level 2; gzip_http_version 1.0; gzip_proxied any; gzip_min_length 1100; gzip_buffers 16 8k; gzip_types text/plain text/html text/css application/x-javascript text/xml application/xml application/xml+rss text/ javascript; # Disable for IE < 6 because there are some known problems gzip_disable "MSIE [1-6].(?!.*SV1)"; # Add a vary header for downstream proxies to avoid sending cached gzipped files to IE6 gzip_vary on;And if you’re using lighttpd on nginx:
# Add mod_compress to your modules server.modules = ( ... "mod_compress", ... ) compress.allowed-encodings = ("gzip", "deflate") compress.filetype = ("text/plain", "text/html", "text/javascript", "text/css", "text/xml") # Don't forget to create a cache directory and add the path here compress.cache-dir = "<your cache directory>" In my case, the web server had gzip compression enabled, but it wasn’t compressing SVG files, so I had to add it to the list of file types the server should compress.
compress.filetype = ( ..., "image/svg+xml")Note:Don’t forget to restart your web server after any change to configuration files.
Checking GZip Compression
To verify that GZip compression is actually working on SVG files, I used Chrome DevTools. Before data compression: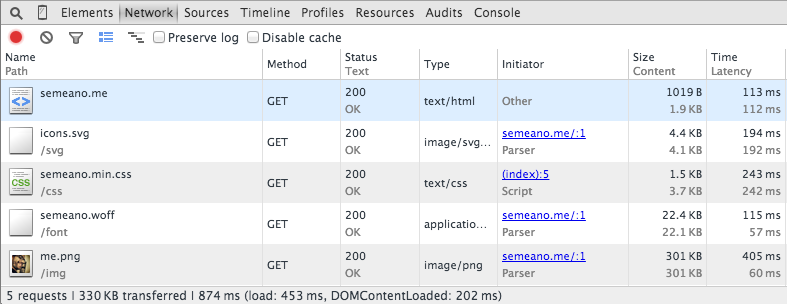
Size: 4.4KB Content: 4.1KBAfter data compression: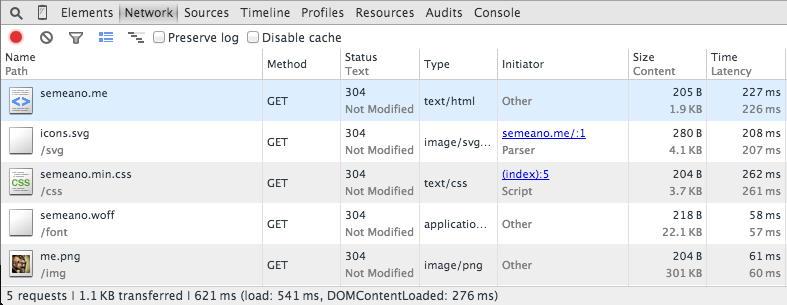
Size: 280B Content: 4.1KB That’s a -93.6% reduction in file size with just a simple tweak of web server configurations!
Conclusion
Now for the moment of truth.
What’s the PageSpeed score of my site after doing all the things I have discussed? Desktop PageSpeed Insights Score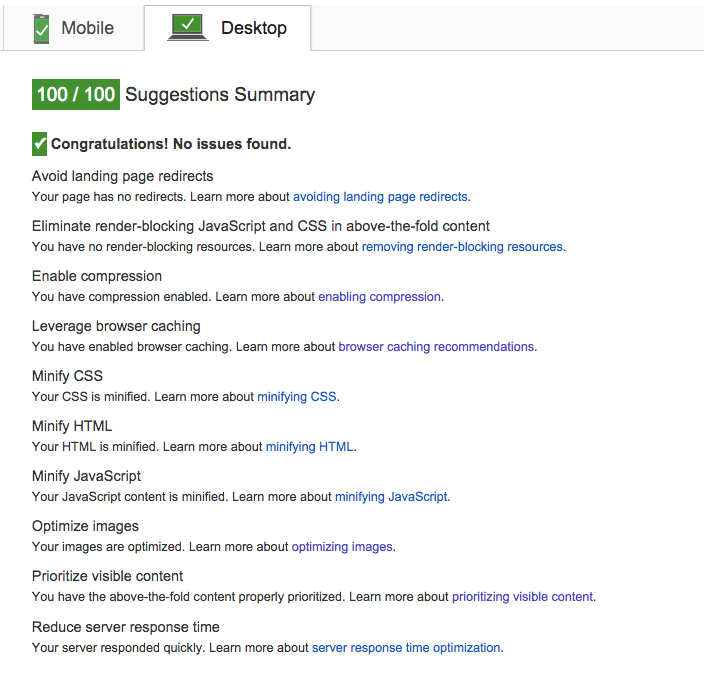 Mobile PageSpeed Insights Score
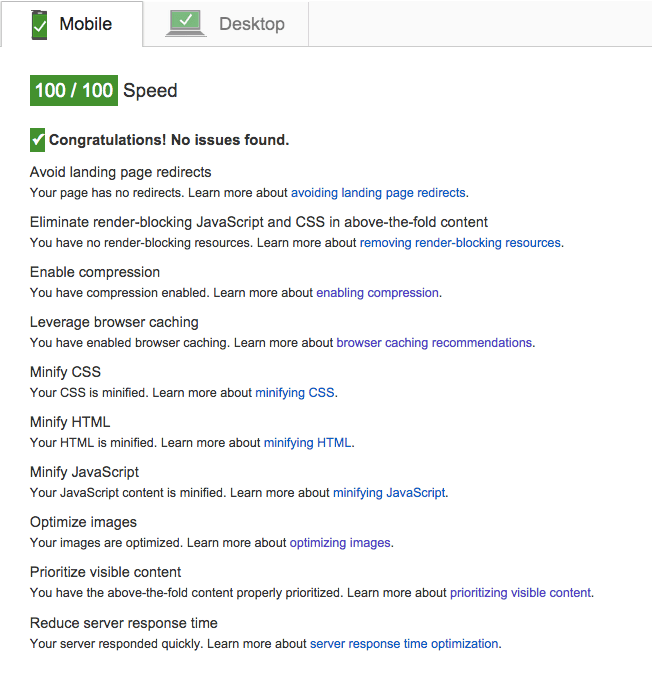 This concludes my series on web performance optimization. I hope that reading this will help you make faster sites!
Also, I hope you have discovered some ideas and techniques for automating your build process so that web performance optimization can be done without too much effort on all your future dev projects. Feel free to share this on Twitter and Facebook if this was helpful to you! We can all benefit from a faster Web.
Also, if you have tips for improving website speed, please share them in the comments! Go to Part 1
Related Content
- 10 Excellent Web Performance Optimization Blogs
- 13 Reasons Why You Should Pay Attention to Mobile Web Performance
- CSS Development at Large-Scale Websites

-
 President of WebFX. Bill has over 25 years of experience in the Internet marketing industry specializing in SEO, UX, information architecture, marketing automation and more. William’s background in scientific computing and education from Shippensburg and MIT provided the foundation for MarketingCloudFX and other key research and development projects at WebFX.
 -

WebFX is a full-service marketing agency with 1,100+ client reviews and a 4.9-star rating on Clutch! Find out how our expert team and revenue-accelerating tech can drive results for you! Learn more
Make estimating web design costs easy
Website design costs can be tricky to nail down. Get an instant estimate for a custom web design with our free website design cost calculator!
Try Our Free Web Design Cost Calculator
Share this article


Web Design Calculator
Use our free tool to get a free, instant quote in under 60 seconds.
View Web Design CalculatorMake estimating web design costs easy
Website design costs can be tricky to nail down. Get an instant estimate for a custom web design with our free website design cost calculator!
Try Our Free Web Design Cost Calculator


